Categories

Welcome! This detailed guide expertly navigates the Rinnai 2001’s features, ensuring safe, efficient operation and maximizing your heating experience.
The Rinnai 2001 is a highly efficient and reliable gas heater designed to provide consistent warmth for your home. Known for its compact size and powerful heating capabilities, this model offers a convenient and cost-effective solution for localized heating needs.
This particular unit utilizes advanced gas combustion technology to deliver a comfortable and consistent temperature. It’s a popular choice for those seeking a supplemental heating source, or for heating smaller spaces effectively.
Understanding the nuances of your Rinnai 2001 is crucial for optimal performance and longevity. This guide will walk you through everything from initial setup and daily operation to essential maintenance procedures, all based directly on the official Rinnai 2001 gas heater manual. Proper use ensures both safety and efficiency.
The Rinnai 2001 gas heater manual is logically organized for easy navigation. It begins with crucial safety information, outlining potential hazards and preventative measures. Following this, you’ll find detailed installation instructions, covering gas and electrical connections, and ventilation requirements.
A significant portion is dedicated to operational guidance, explaining the control panel, temperature settings, and various modes of operation. The manual also includes a comprehensive maintenance section, detailing cleaning schedules, filter replacement, and troubleshooting steps.
Finally, a technical appendix provides component breakdowns, error code explanations, and warranty details. Familiarizing yourself with this structure will allow you to quickly locate specific information when needed, ensuring efficient use and maintenance of your heater.
Prioritize safety! Carefully review all warnings within this manual before operating your Rinnai 2001, preventing potential hazards and ensuring secure usage.
Understanding the Danger: Carbon monoxide (CO) is a colorless, odorless, and potentially fatal gas produced by incomplete combustion. Your Rinnai 2001, while designed for safe operation, can produce CO if not properly maintained or ventilated. Exposure can cause flu-like symptoms, dizziness, nausea, and even death.
CO Detector Importance: Crucially, install a working CO detector near the heater and in living areas. Test it monthly and replace batteries twice a year. The manual details recommended detector placement for optimal safety.
Recognizing Symptoms: Familiarize yourself with CO poisoning symptoms. If anyone experiences these symptoms, immediately evacuate the premises and call emergency services. Never ignore potential CO exposure.
Preventative Measures: Regular maintenance, as outlined in this manual, minimizes CO risk. Ensure proper ventilation and never obstruct the heater’s air intake or exhaust vents.
Immediate Action is Critical: If you suspect a gas leak – a smell of gas, hissing sound, or dead vegetation near the heater – immediately follow these procedures. Your safety is paramount.
Do Not Operate Electrical Devices: Absolutely do not operate any electrical switches, phones (including mobile phones), or anything that could create a spark. Sparks can ignite the gas.
Evacuate & Ventilate: Evacuate everyone from the building immediately. Open windows and doors to ventilate the area, but do not attempt to extinguish any flame.
Contact Authorities & Rinnai: From a safe location, call your gas company and emergency services. Then, contact Rinnai support (details in the manual) for assistance. Do not re-enter the building until authorized by professionals.
Manual Reference: The manual provides specific contact numbers and emphasizes the importance of professional inspection before resuming heater operation.
Knowing how to quickly shut off the gas supply is vital in an emergency. The Rinnai 2001 features a clearly marked gas shut-off valve, typically located near the gas connection point.
Valve Operation: To shut off the gas, turn the valve handle perpendicular to the gas pipe. This position indicates the gas flow is stopped. Do not force the valve; it should turn smoothly.
Post-Shutoff Actions: After shutting off the gas, do not attempt to relight the heater. Contact a qualified gas technician to inspect the system and identify the cause of the emergency before restoring gas flow.
Manual Diagram: The manual includes a detailed diagram illustrating the exact location of the shut-off valve and provides a visual guide to its operation. Familiarize yourself with this diagram.
Regular Checks: Periodically check the valve to ensure it operates freely and isn’t obstructed. This proactive step enhances safety.

Proper installation is key! Carefully follow the manual’s detailed instructions for safe and efficient setup of your new Rinnai 2001 gas heater.
Before first use, a thorough checklist is vital. Confirm the Rinnai 2001 is positioned on a level surface, adhering to the manual’s clearance requirements. Verify the gas supply is compatible and properly connected by a qualified technician – do not attempt this yourself!
Inspect all gas connections for leaks using a soap solution, as detailed in the safety section. Ensure the ventilation system is unobstructed and meets the specified requirements for proper exhaust.
Double-check the electrical connection, confirming correct voltage and grounding. Familiarize yourself with the location of the emergency shut-off valve. Finally, review the manual’s startup procedure before powering on the unit. A completed checklist ensures safe and optimal performance from the outset.
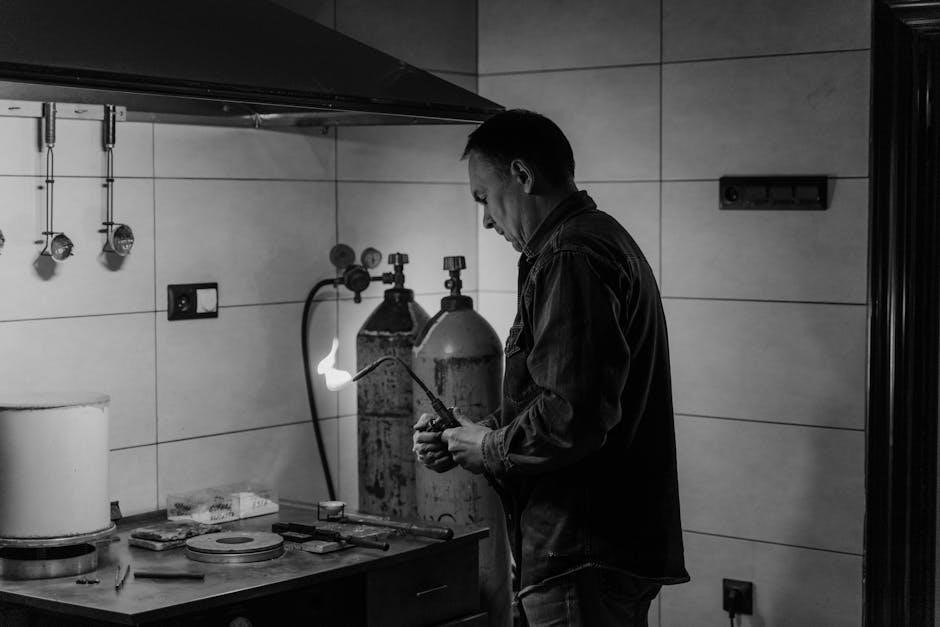
Critical: Gas connections must be performed by a licensed and qualified gas technician, adhering to all local and national codes; The Rinnai 2001 requires a specific gas supply pressure – consult the manual’s specifications table for precise details.
A dedicated gas line is highly recommended; do not connect to an existing appliance line without professional assessment. The manual details acceptable pipe materials (typically black iron or approved flexible gas lines) and sizing charts based on run length.
A shut-off valve must be installed upstream of the heater for emergency access. Always leak-test all connections with a non-corrosive leak detection fluid after installation and before operation. Improper gas connections pose a serious safety hazard.
Essential for Safety: The Rinnai 2001 requires adequate ventilation to safely operate. This unit is a Category I appliance, needing a dedicated flue for exhaust gases. The manual provides detailed diagrams illustrating acceptable venting configurations – direct vent, or natural draft.
Incorrect venting can lead to carbon monoxide buildup, a life-threatening hazard. Ensure the flue pipe is the correct diameter, material (typically stainless steel), and slope as specified. Avoid sharp bends or obstructions within the vent system;
Regularly inspect the vent for blockages (bird nests, debris). Never operate the heater if the vent is compromised. Local codes may have specific ventilation requirements; always comply with those regulations.

Effortless Warmth: Discover simple steps for ignition, temperature adjustments, and fan control, unlocking the full potential of your Rinnai 2001 heater.
Initial Power-Up: Before the first use, ensure the gas supply is connected and the unit is properly ventilated, as detailed in the installation section. Locate the power switch, typically found on the control panel – it’s often clearly labeled ‘ON/OFF’ or features a power symbol.
Turn the switch to the ‘ON’ position. You should hear a faint clicking sound as the internal components initialize. The control panel display will illuminate, potentially showing a self-diagnostic check.
Ignition Sequence: The Rinnai 2001 utilizes electronic ignition. Allow a few seconds for the heater to attempt ignition. You may hear a further clicking sound as the igniter sparks. If ignition doesn’t occur within 30-60 seconds, consult the troubleshooting section. Do not repeatedly attempt ignition; this could flood the system.
Once ignited, the heater will begin warming up. Observe the flame through the viewing window (if equipped) to confirm proper combustion.
Adjusting the Heat: The Rinnai 2001 offers precise temperature control via the control panel. Typically, this is managed using either rotary dials or electronic buttons with a digital display. Rotate the dial clockwise to increase the desired temperature and counter-clockwise to decrease it.
Temperature Range: The heater generally operates within a temperature range of 15°C to 30°C (59°F to 86°F), though specific ranges may vary. The display will show the set temperature. Allow sufficient time for the heater to reach the selected temperature after adjustment.
Preset Modes: Some models feature preset temperature modes like ‘Low,’ ‘Medium,’ and ‘High’ for convenience. Experiment to find the setting that best suits your comfort level. Important: Avoid setting excessively high temperatures, especially in enclosed spaces.
Controlling Airflow: The Rinnai 2001 allows you to adjust the fan speed to optimize heat distribution and comfort. Fan speed settings are usually controlled via buttons or a selector switch on the control panel. Common settings include ‘Low,’ ‘Medium,’ and ‘High.’
Low Speed: Use the low fan speed for gentle, consistent heating in smaller rooms or for maintaining a comfortable temperature. Medium Speed: This setting provides a balance between airflow and noise level, suitable for most situations.
High Speed: Select high speed for rapid heating of larger spaces. Note that higher fan speeds will generate more noise. Auto Mode: Some models include an ‘Auto’ fan speed setting, which automatically adjusts the fan based on the set temperature and room conditions;

Keep it running smoothly! Regular upkeep and swift problem-solving, guided by this manual, will ensure years of reliable warmth from your Rinnai 2001.
Maintaining a clean Rinnai 2001 is crucial for optimal performance and longevity. Dust and debris accumulation can significantly reduce efficiency and even pose safety hazards. The exterior casing should be wiped down weekly with a soft, damp cloth – never use abrasive cleaners.
More in-depth cleaning, performed monthly, involves carefully vacuuming the air intake and exhaust vents to ensure unobstructed airflow. Always disconnect the power supply before cleaning internal components. The burner assembly requires periodic inspection for obstructions, detailed in the manual’s component breakdown section.
Pay close attention to the fan blades, gently removing any accumulated dust. Avoid getting any liquids inside the unit. Consistent cleaning, as outlined in this manual, will contribute to a safer and more efficient heating experience, extending the life of your Rinnai 2001.
The Rinnai 2001 utilizes an air filter to maintain air quality and protect internal components. Regular filter replacement – typically every 3-6 months, depending on usage – is essential. First, always disconnect the power supply to the heater. Locate the filter access panel, usually on the front or side of the unit (refer to the manual’s component breakdown for precise location).
Remove the old filter, noting its orientation for correct installation of the new one. Vacuum the filter compartment to remove any lingering dust. Insert the new filter, ensuring it’s properly seated and the access panel is securely closed.
Use only Rinnai-approved replacement filters to guarantee optimal performance and prevent damage. Discard the used filter responsibly. A clean filter ensures efficient heating and improved indoor air quality, contributing to a healthier home environment.
The Rinnai 2001 displays error codes to indicate specific issues. Refer to the manual’s dedicated troubleshooting section for a complete list. Error Code 11 often signals a flame rectification issue – check the burner for obstructions. Code 31 typically indicates a gas supply problem; verify the gas valve is open and there are no leaks.
Code 42 suggests a ventilation blockage; ensure vents are clear. Error 50 can relate to overheating – immediately power off the unit. If an error persists after attempting basic troubleshooting, do not attempt repairs yourself.
Always disconnect the power and contact a qualified Rinnai service technician. Ignoring error codes can lead to further damage or unsafe operating conditions. The manual provides detailed explanations and recommended actions for each code.

Explore the Rinnai 2001’s core components, meticulously detailed within the manual, for a deeper understanding of its inner workings and functionality.
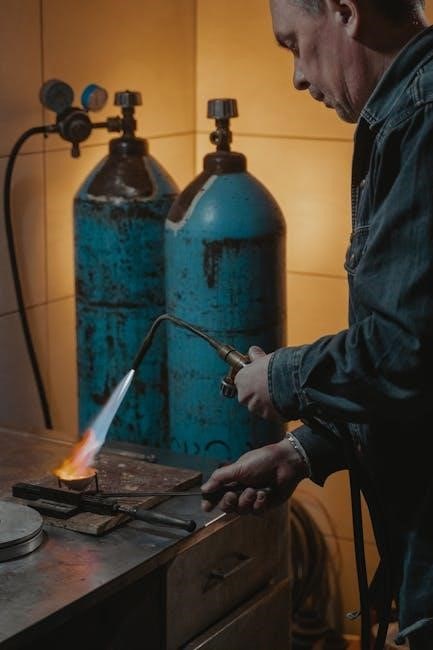
The burner assembly is the heart of the Rinnai 2001, responsible for igniting and maintaining the flame that generates heat. The manual stresses regular visual inspections for any signs of corrosion, damage, or blockage. Specifically, check the burner ports for obstructions – dust, debris, or spiderwebs can significantly impact performance.
Carefully examine the flame pattern during operation; it should be a stable, blue flame. Yellow or orange flames indicate incomplete combustion and require immediate attention – potentially a gas mixture issue or burner component failure. The manual details how to safely remove and clean the burner assembly, emphasizing the importance of disconnecting the gas supply before any maintenance. Replacement parts should always be genuine Rinnai components, as specified in the manual, to ensure compatibility and safety.
The gas valve regulates the flow of gas to the burner, controlling the heater’s intensity. The Rinnai 2001 manual details its two primary states: open and closed. Crucially, the valve is operated by both the control panel and safety devices, like the flame failure device. Understanding this interplay is vital for troubleshooting.
The manual emphasizes never attempting to repair the gas valve yourself; it’s a sealed unit requiring professional servicing. It explains how the valve receives signals from the thermostat and adjusts gas flow accordingly. Symptoms of a faulty gas valve include difficulty igniting, inconsistent flame, or gas smell even when the heater is off. The manual provides a clear warning against bypassing any safety features associated with the gas valve, highlighting the potential for dangerous gas leaks or explosions.
The Rinnai 2001’s control panel is the central hub for operation. The manual dedicates significant space to detailing each button and indicator light. You’ll find explanations for the power button, temperature adjustment controls (up/down arrows), fan speed settings (low, medium, high, auto), and mode selection (heat, auto).
Indicator lights signal operational status – power on, flame detected, error codes (detailed elsewhere in the manual). The manual stresses the importance of understanding these lights for safe and efficient use. It also explains the function of any timer settings or remote control pairing buttons present on the panel. Diagrams are included for visual clarity. Remember, attempting to disassemble or modify the control panel voids the warranty and poses a safety risk.

Explore the Rinnai 2001’s sophisticated capabilities: timer functions, remote control options, and the energy-saving Eco Mode for optimal performance and comfort.
The Rinnai 2001 boasts a versatile timer function, allowing for pre-set heating schedules to maximize comfort and energy efficiency. You can program the heater to automatically turn on and off at specific times throughout the day, or even on different days of the week.
Access the timer settings through the control panel – refer to the manual’s diagram for precise button locations. The manual details how to set both a single event and recurring schedules. Remember to confirm the correct time and date are programmed for accurate operation.
Utilize the timer to warm your home before you arrive, or to automatically reduce heating during sleep or when the house is unoccupied. This feature significantly contributes to lower energy bills and a consistently comfortable indoor environment. Always double-check programmed times after initial setup.
The Rinnai 2001 is conveniently operated via a dedicated remote control, offering effortless adjustment of settings from anywhere within range. The manual provides a detailed button layout diagram, explaining each function. Ensure the remote has fresh batteries for optimal performance – the manual specifies the correct battery type.
Beyond basic on/off and temperature control, the remote allows access to fan speed adjustments, timer settings, and even Eco Mode. Point the remote directly at the heater’s receiver for reliable communication. Note that some functions may require initial setup through the main control panel, as detailed in the manual.
Keep the remote in a safe place to prevent loss or damage. If the remote becomes unresponsive, consult the troubleshooting section of the manual before attempting repairs. Utilizing the remote enhances user convenience and control over your heating environment.
The Rinnai 2001 features an Eco Mode designed to minimize gas consumption while maintaining comfortable warmth. Activated via the remote control or the main unit’s control panel, Eco Mode subtly reduces heating output, ideal for moderately cold conditions. The manual details the estimated energy savings achievable with consistent Eco Mode use.
Beyond Eco Mode, several practices enhance energy efficiency. Ensure proper insulation in your home to retain heat. Avoid blocking the heater’s air intake or outlet. Utilize the timer function to schedule operation only when needed, preventing unnecessary heating. Regularly clean the air filter (see Maintenance section) for optimal airflow.
Consider lowering the thermostat slightly and layering clothing for added comfort. These simple adjustments, combined with Eco Mode, contribute to reduced energy bills and a smaller environmental footprint.
Locate key details – serial numbers, warranty specifics, and support contact information – within the manual’s opening pages for easy reference and assistance.
Identifying your Rinnai 2001’s specifics is crucial for warranty claims, accessing correct support documentation, and ordering replacement parts. The model number and serial number are typically found on a sticker affixed to the unit itself.
Look for a silver or white label, often located on the rear panel or the bottom of the heater. The serial number is a unique identifier for your specific unit, while the model number confirms it’s a Rinnai 2001.
Carefully record both numbers in a safe place – ideally, alongside a copy of your purchase receipt. This information will be required when contacting Rinnai support or an authorized service technician. Refer to the manual’s diagram (usually on page 2) for the precise label location on your model.
Your Rinnai 2001 gas heater is covered by a manufacturer’s warranty, protecting against defects in materials and workmanship. The specific warranty duration varies depending on the component – typically, longer periods cover the heat exchanger, while shorter terms apply to parts and labor.
To validate your warranty, it’s essential to register your heater promptly after installation. This can usually be done online through the Rinnai website (details are in the manual, page 15) or by completing and returning the registration card included with the unit.
Keep your proof of purchase (receipt) safe, as it’s required for any warranty claim. The manual outlines the complete warranty terms and conditions, including what is covered and excluded.
Need assistance with your Rinnai 2001? The manual provides comprehensive contact information for Rinnai’s support team. A dedicated toll-free number is listed on page 18 for direct phone support, allowing you to speak with a qualified technician.
For email inquiries, the manual details the official Rinnai support email address, ensuring a documented record of your request. Website support is also available, offering FAQs, troubleshooting guides, and online chat options – the web address is clearly stated on page 20.
Before contacting support, have your model number and serial number readily available (see section 5.1). This will expedite the process and ensure they can provide the most accurate assistance.