Categories

Welcome! This guide provides detailed instructions for your Pax Mini‚ ensuring a smooth and enjoyable experience with this portable‚ efficient vaporizer.
The Pax Mini represents a significant evolution in portable vaporization technology‚ offering a discreet and powerful experience in a remarkably compact design. Unlike bulkier vaporizers‚ the Mini prioritizes portability without sacrificing performance or vapor quality. It’s engineered for on-the-go use‚ fitting comfortably in a pocket or bag‚ making it ideal for individuals with active lifestyles.
This device utilizes conduction heating‚ efficiently transferring heat to your material for consistent and flavorful vapor production. The Pax Mini isn’t just about convenience; it’s about control. Through intuitive one-button operation and customizable temperature settings‚ users can tailor their experience to their preferences.
Whether you’re a seasoned vaporizer enthusiast or new to the world of portable vaporizers‚ the Pax Mini offers a user-friendly experience. This guide will walk you through every step‚ from unboxing and charging to operation‚ maintenance‚ and troubleshooting‚ ensuring you get the most out of your new device.

Carefully open your Pax Mini packaging to reveal the contents within. You should find the Pax Mini device itself‚ elegantly designed and ready for use. Alongside the device‚ you’ll receive a USB charging cable‚ essential for powering up your vaporizer. Pax includes a handy oven lid‚ used for both loading and protecting the heating chamber when not in use.
Additionally‚ you’ll discover three maintenance brushes – a small brush for cleaning the oven‚ a larger brush for the mouthpiece‚ and a brush specifically designed for the charging port. These are crucial for maintaining optimal performance and hygiene. A set of oven screens are also included; these small‚ stainless steel screens sit at the bottom of the oven to prevent material from falling into the device.
Finally‚ your box contains important documentation‚ including a quick start guide and a more detailed user manual. Take a moment to familiarize yourself with these resources before first use.

Let’s familiarize ourselves with the Pax Mini’s design. The heating chamber‚ or ‘oven’‚ is where your material is placed for vaporization. Locate the oven lid‚ magnetically attached‚ which covers and protects the oven. The mouthpiece is the part you inhale from; it’s easily removable for cleaning.
You’ll find a single multi-purpose button on the device’s body. This button controls power‚ temperature selection‚ and initiates heating. Observe the LED indicator lights‚ which communicate the device’s status – power on/off‚ heating‚ and temperature reached. The USB charging port is located on the bottom of the device‚ used with the included USB cable.
Notice the textured body of the Pax Mini‚ designed for a comfortable and secure grip. The device’s compact size makes it highly portable. Finally‚ identify the oven screen placement at the base of the oven chamber‚ ensuring proper airflow and preventing debris from entering the device’s internals.
Your Pax Mini kit comes with several essential accessories to enhance your experience. You’ll receive a USB charging cable‚ used to power up your device via a USB port – a wall adapter is typically not included. A replacement oven lid is provided; these are prone to misplacement‚ so having a spare is useful.
The kit also includes three chamber screens‚ vital for preventing material from falling into the device’s internal components. These screens require periodic replacement for optimal performance. You’ll find a maintenance brush‚ designed for gentle cleaning of the oven and mouthpiece.
Additionally‚ a set of oven packing tools assists in achieving an even and consistent pack‚ crucial for efficient vaporization. Finally‚ the package contains a user manual‚ offering detailed instructions and safety information. Keep this manual for future reference and troubleshooting. These accessories ensure a seamless and well-maintained Pax Mini experience.
Charging is simple with the included USB cable. Locate the charging port‚ typically found on the bottom of the device. Connect the USB cable to the Pax Mini and a powered USB source – a computer USB port or a USB wall adapter (not included) will work.
The Pax Mini does not have a dedicated power button; it automatically turns on when you begin to heat it. Charging time varies‚ but a full charge generally takes between 90 to 120 minutes. Avoid using fast chargers‚ as they can potentially damage the battery.
It’s best to fully charge your Pax Mini before its initial use to ensure optimal battery performance. While charging‚ the device will display a pulsing light pattern. Once fully charged‚ the light will indicate a solid color‚ signifying readiness. Regular charging maintains consistent vapor production and extends the lifespan of your device’s battery.
Before your first session‚ a complete initial charge is crucial for maximizing battery health and ensuring consistent performance. Connect your Pax Mini to a USB power source using the provided cable. Allow the device to charge uninterrupted for approximately 90-120 minutes‚ even if the charging indicator appears full sooner.
During this initial charge‚ the device’s LED indicator will pulse‚ signaling the charging process. Once fully charged‚ the LED will transition to a solid color‚ confirming readiness. Do not interrupt the charging cycle until the solid light appears.
This full initial charge calibrates the battery and optimizes its long-term functionality. A properly charged Pax Mini will deliver consistent heat-up times and vapor production. Skipping this step may result in reduced battery life or inconsistent performance in subsequent uses. Enjoy your first session with a fully prepared device!

The Pax Mini utilizes a simple LED indicator to communicate its charging status. When connected to a power source‚ a pulsing light signifies that the device is actively charging. The color of the pulse indicates the approximate charge level – typically‚ a slower pulse suggests a lower charge‚ while a faster pulse indicates nearing full capacity.
Once fully charged‚ the LED will illuminate with a solid color‚ confirming that the device is ready for use. If the device is in use while charging‚ the LED will display a unique pattern to indicate simultaneous operation. A flashing light can also signal low battery; it’s time to recharge!
Pay attention to these signals to maintain optimal performance. Ignoring low battery warnings can lead to interrupted sessions. Regularly checking the indicator ensures you’re always prepared for your next experience. Refer to the full manual for a complete breakdown of all LED behaviors.
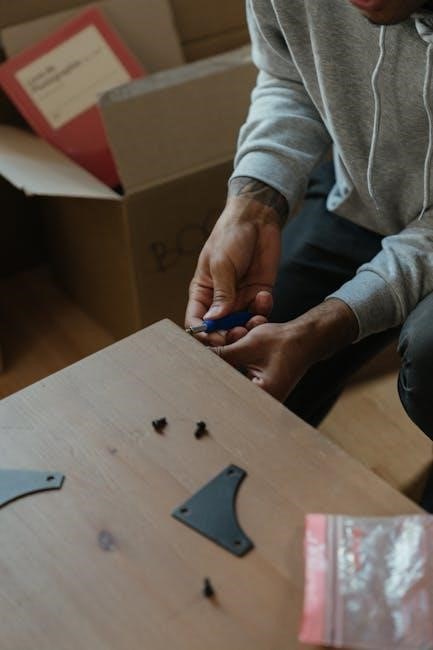
Proper loading is crucial for maximizing your Pax Mini experience. Begin by gently removing the oven lid‚ revealing the heating chamber. The Pax Mini is designed for use with finely ground material‚ ensuring even heating and efficient vapor production. Avoid overpacking; a lightly packed oven allows for better airflow and consistent results.
Don’t compress the material too tightly‚ as this can restrict airflow and lead to uneven heating. A loose‚ fluffy pack is ideal. Experiment with different packing densities to find what works best for your preferred material and desired vapor density; Remember‚ less is often more when it comes to loading your Pax Mini.
Once loaded‚ securely replace the oven lid. Ensure it’s firmly in place to maintain consistent temperature and prevent any material from escaping during operation.
Consistent grinding is paramount for optimal Pax Mini performance. A fine‚ even grind allows for efficient and uniform heating‚ maximizing vapor production and flavor. Avoid using pre-ground material‚ as it often lacks the necessary consistency. Investing in a quality grinder – either manual or electric – is highly recommended.
The ideal consistency resembles coarsely ground coffee or fine herbs. Too coarse‚ and the material won’t heat evenly‚ resulting in weak vapor. Too fine‚ and it may clog the airflow‚ hindering performance. Experiment with your grinder’s settings to achieve the sweet spot.
Ensure your grinder is clean before each use to prevent cross-contamination of flavors. Properly ground material will significantly enhance your Pax Mini sessions‚ delivering a smoother‚ more flavorful experience.

Evenly packing the Pax Mini’s oven is crucial for consistent vapor production and preventing combustion. Avoid overpacking‚ as this restricts airflow and leads to uneven heating. A gently filled‚ not compressed‚ oven is ideal.
Start by lightly filling the oven‚ then gently tap the device to settle the material. Avoid pressing down firmly. You want the material to be loosely distributed‚ allowing hot air to circulate freely. A good rule of thumb is to fill the oven about 80-90% full.
For smaller loads‚ consider using a Pax Mini packing tool or a folded piece of cardstock to help distribute the material evenly. Consistent packing ensures every part of your material is heated effectively‚ maximizing flavor and minimizing waste.
Getting started with your Pax Mini is remarkably simple. Once charged and loaded‚ operation is intuitive. The device utilizes a single‚ multi-function button located on the side.
To power on the Pax Mini‚ press the button five times rapidly. The device will illuminate‚ indicating it’s active and begin heating to your pre-selected temperature. You can adjust the temperature using the Pax app (available for iOS and Android) for precise control.
To take a draw‚ simply place your lips on the mouthpiece and inhale gently. The Pax Mini is draw-activated‚ meaning it heats up further with each puff. The device will automatically shut off after a period of inactivity to conserve battery life. Remember to allow sufficient time between draws for optimal vapor production.
Initiating use of your Pax Mini is straightforward. To power on the device‚ firmly press the stainless steel mouthpiece button five times in quick succession. A visual cue – the illuminated Pax logo – confirms successful activation and indicates the device is beginning its heating cycle.
Shutting down the Pax Mini is equally simple. Again‚ press the mouthpiece button five times rapidly. The Pax logo will extinguish‚ signifying the device is now off and conserving battery power. It’s crucial to ensure a complete shutdown when not in use to prevent accidental activation and preserve battery life.
Adjusting the temperature on your Pax Mini is done through the device’s intuitive single-button control. After powering on‚ simply press the mouthpiece button three times to cycle through the pre-set temperature ranges. Each press advances to the next available heat setting.
The Pax Mini utilizes a color-coded LED system to indicate the selected temperature. Green represents the lowest setting‚ yellow signifies a medium temperature‚ and red indicates the highest heat level. Understanding this color scheme allows for quick and easy temperature selection without needing to consult a chart.

Experimentation is key to finding your ideal temperature. Lower settings prioritize flavor‚ while higher temperatures maximize vapor production. Remember to allow sufficient time for the device to heat up after each temperature adjustment.
The Pax Mini offers three primary temperature modes‚ each designed to deliver a distinct vaping experience. These modes aren’t numerically defined‚ but rather represented by color and corresponding effects on vapor quality and density.
Low Temperature (Green): This setting‚ typically between 180°C ─ 200°C (356°F ⎼ 392°F)‚ emphasizes flavor preservation. Expect a lighter‚ more nuanced vapor‚ ideal for savoring the subtle notes of your chosen material. It’s a great starting point for flavor connoisseurs.
Medium Temperature (Yellow): Ranging from 200°C ⎼ 210°C (392°F ⎼ 410°F)‚ this mode strikes a balance between flavor and vapor production. You’ll experience a more noticeable vapor density while still retaining a good amount of the original taste.
High Temperature (Red): Above 210°C (410°F)‚ this setting prioritizes maximum vapor production. Flavor will be less pronounced‚ but you’ll achieve thick‚ potent clouds. Best for users seeking a strong and immediate effect.
Utilizing the green temperature setting on your Pax Mini unlocks a truly flavor-focused experience. This lower heat range‚ generally between 180°C and 200°C (356°F ─ 392°F)‚ delicately extracts the aromatic compounds from your material without combusting it.
Expect a thinner‚ more translucent vapor that carries the subtle nuances of your blend. This mode is perfect for appreciating the terpene profiles and delicate flavors often lost at higher temperatures. It’s ideal for those who prioritize taste over massive cloud production.

Start with a gentle draw and gradually increase the intensity to find your sweet spot. The low temperature setting is also more forgiving‚ minimizing the risk of harshness or burning. Remember‚ patience is key – allow the Pax Mini to fully heat up for optimal flavor extraction.
The yellow temperature range on your Pax Mini strikes a beautiful balance between flavor and vapor density. Typically falling between 200°C and 210°C (392°F ─ 410°F)‚ this setting provides a satisfying experience for a wide range of users.
You’ll notice a more substantial vapor production compared to the low-temperature setting‚ while still retaining a significant amount of the material’s original flavor. This is an excellent choice for all-day use‚ offering a pleasant and versatile vaping session.
Experiment within this range to discover your personal preference. A slightly cooler medium temperature will lean towards flavor‚ while a warmer setting will emphasize vapor production. Consistent‚ moderate draws will yield the best results‚ ensuring even heating and a smooth‚ enjoyable experience.
Reaching the red temperature range‚ typically between 210°C and 220°C (410°F ⎼ 428°F)‚ the Pax Mini delivers maximum vapor production. This setting is ideal for users who prioritize thick‚ potent clouds and a fast-acting experience.
Flavor will be less pronounced at these higher temperatures‚ as more cannabinoids and terpenes are vaporized‚ resulting in a stronger‚ more intense effect. Be mindful of your tolerance and start with shorter sessions when exploring this range.
Shorter‚ more deliberate draws are recommended to avoid harshness. The higher heat can quickly vaporize your material‚ so efficient packing and mindful usage are key. This setting is particularly effective for materials that require higher temperatures to fully extract their compounds‚ offering a robust and satisfying session.
Regular maintenance is crucial for optimal performance and longevity of your Pax Mini. Consistent cleaning prevents buildup that can affect vapor quality and device functionality. After each session‚ allow the device to cool completely before cleaning.
Use the included multi-tool to gently scrape the oven and remove any leftover material. A small amount of isopropyl alcohol on a cotton swab can assist with stubborn residue‚ ensuring it evaporates fully before reuse. Avoid submerging the device in liquid.
Pay attention to the mouthpiece and screen‚ cleaning them regularly to maintain airflow. A clean Pax Mini delivers the purest flavor and most efficient vapor production‚ enhancing your overall experience. Neglecting cleaning can lead to diminished performance and potential damage.
Consistent‚ quick cleaning after each use is the cornerstone of Pax Mini maintenance. This prevents resin buildup‚ preserving both flavor and vapor quality. Always ensure the device is completely cool to the touch before beginning any cleaning process.
Utilize the included multi-tool to carefully scrape the oven chamber‚ removing any remaining plant material. For the mouthpiece‚ a simple wipe-down with a clean‚ dry cloth is often sufficient. Inspect the screen for any obstructions and gently brush away debris.
Avoid harsh chemicals or abrasive cleaners‚ as these can damage the device’s delicate components. A slightly damp (not wet!) cotton swab can address minor residue. Regular attention to these details will keep your Pax Mini performing at its best‚ session after session.
Periodically‚ a more thorough deep clean is necessary to remove stubborn resin and maintain optimal performance. This should be done every 20-30 uses‚ or as needed based on usage frequency. Always power off and allow the device to cool completely.
Disassemble the mouthpiece (following the manufacturer’s instructions) and soak the components in isopropyl alcohol (91% or higher) for at least 30 minutes. Use the included multi-tool to gently scrub the oven chamber and screen‚ again with isopropyl alcohol.
Ensure all alcohol is completely evaporated before reassembling and using the device. A small amount of baking soda can be used as a gentle abrasive for particularly stubborn buildup. Never submerge the base unit in liquid. Proper deep cleaning extends the lifespan and ensures consistently flavorful sessions.
If your Pax Mini isn’t heating‚ first ensure it’s adequately charged. A flashing orange light indicates low battery. If charging doesn’t resolve the issue‚ try a different USB cable and power source. For uneven heating‚ confirm your material is ground to a consistent consistency and packed loosely within the oven.
If you experience a weak vapor production‚ check the screen for clogging and clean it thoroughly. A persistent error message may require a device reset (consult the manufacturer’s website for specific instructions). If the device gets unexpectedly hot‚ immediately power it off and allow it to cool.
Remember to regularly update the firmware via the Pax Labs app for optimal performance and bug fixes. If problems persist‚ contact Pax Labs customer support for assistance.