Categories
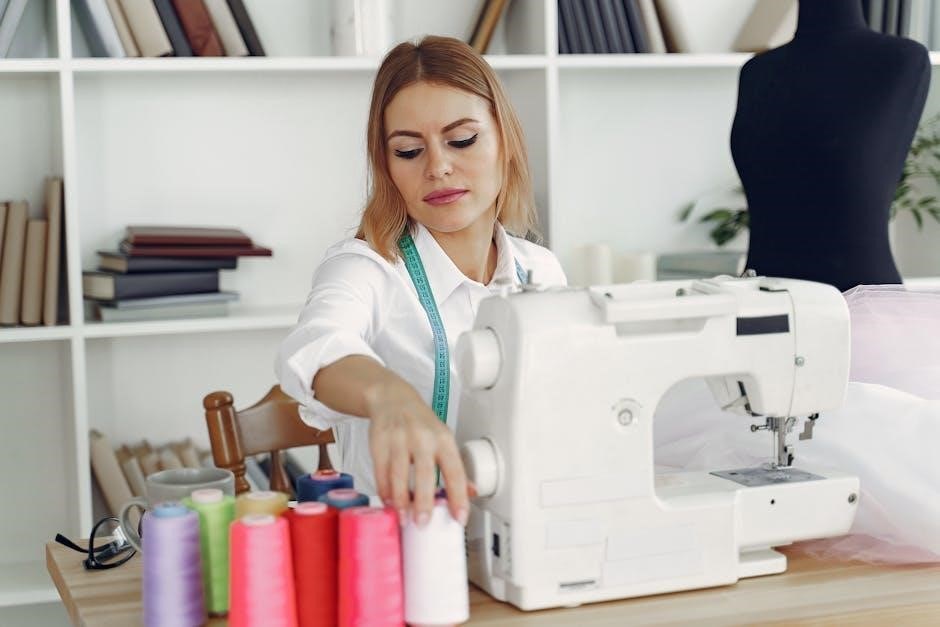
The Lil’ Sew & Sew is a compact‚ user-friendly sewing machine designed for beginners and quick repairs‚ offering simplicity and portability;
The Lil’ Sew & Sew by Tivax is a lightweight and portable sewing machine specifically engineered for introductory sewing projects and everyday mending․ It’s a fantastic entry point for those curious about sewing‚ offering a simplified experience without sacrificing core functionality․
Unlike larger‚ more complex machines‚ the Lil’ Sew & Sew focuses on essential stitches – primarily the straight stitch – making it incredibly easy to learn and operate․ Its compact size makes it ideal for small spaces‚ dorm rooms‚ or taking to classes and workshops․
This machine isn’t intended for heavy-duty projects or frequent‚ large-scale sewing․ Instead‚ it excels at quick fixes‚ crafting small items‚ and building a foundational understanding of sewing principles․ It’s a durable and reliable tool for beginners and a convenient option for experienced sewers needing a portable solution․
The Lil’ Sew & Sew is ideally suited for several groups․ First‚ it’s perfect for absolute beginners – those with no prior sewing experience – who want a gentle introduction to the craft․ Its simplicity minimizes intimidation and fosters confidence․
Secondly‚ it’s a great choice for students needing a portable machine for school projects or sewing classes․ Its lightweight design and compact size make it easy to transport․
Furthermore‚ the Lil’ Sew & Sew appeals to individuals who require a machine for quick repairs and alterations – hemming pants‚ fixing seams‚ or attaching buttons․ It’s also excellent for craft enthusiasts working on small projects like quilting squares or creating simple fabric crafts․ Finally‚ it’s a good backup machine for experienced sewers․

Carefully unpack your Lil’ Sew & Sew‚ ensuring all components are present and undamaged before proceeding with the initial setup process․
Before you begin‚ let’s verify you have all the necessary components․ Your Lil’ Sew & Sew by Tivax box should include the following:
If any items are missing or damaged‚ please contact Tivax customer support immediately․
Connecting the Power: First‚ plug the power adapter into the machine’s DC jack and then into a suitable wall outlet․ Ensure the voltage matches the machine’s requirements․
Power Switch: Locate the power switch‚ typically on the side or back of the machine․ Flip the switch to the “ON” position․ You should hear a quiet hum indicating the machine is receiving power․
Foot Pedal Test: Gently press the foot pedal․ The needle should begin to move․ Vary the pressure on the pedal to control the sewing speed․ If the needle doesn’t move‚ double-check the power connection and switch․
Initial Stitch Test: With a piece of scrap fabric in place (without thread initially)‚ briefly press the foot pedal to confirm the mechanism is functioning smoothly․
Familiarizing yourself with each component is crucial for effective operation and maintenance of your Lil’ Sew & Sew by Tivax․
Below is a labeled diagram illustrating the essential parts of your Lil’ Sew & Sew machine․ Take a moment to study it carefully․ Key areas include the handwheel‚ used for manual control; the spool pin‚ where thread spools are placed; the bobbin winder‚ for preparing bobbins; and the needle clamp‚ securing the needle․
Notice the presser foot‚ which holds fabric in place‚ and the presser foot lever‚ controlling its lifting and lowering․ The stitch length dial adjusts the length of stitches‚ while the stitch width dial controls their width․ The reverse lever enables backstitching for secure seams․ Finally‚ locate the power switch and the foot pedal connector․ Understanding these components will greatly aid in operating and maintaining your machine effectively․
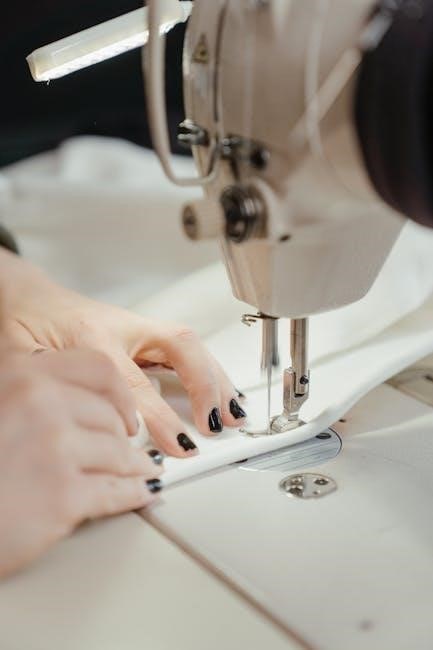
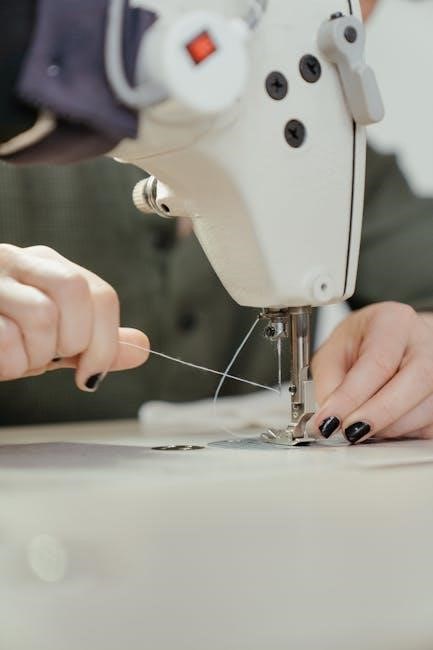
Begin by placing your thread spool onto the spool pin‚ ensuring it rotates freely․ Next‚ guide the thread through the first thread guide‚ typically located near the spool pin․ Then‚ lead the thread down and around the tension discs – this is crucial for proper stitch formation․ Continue threading through the take-up lever‚ ensuring the thread is securely seated․
After the take-up lever‚ thread the needle from front to back․ A needle threader can be helpful for this step․ Gently pull a length of thread (about 6 inches) through the needle eye․ Double-check that the thread is correctly seated in all guides and the tension discs․ Incorrect threading is a common cause of sewing problems‚ so take your time and refer to the diagram if needed․
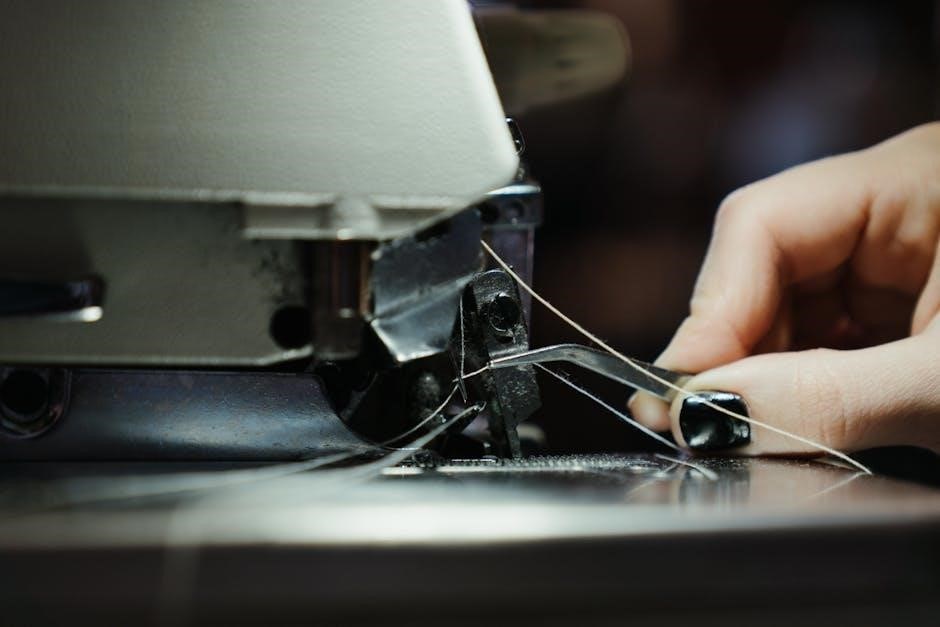
To wind the bobbin‚ place the thread spool on the spool pin and guide the thread to the bobbin winding shaft․ Engage the bobbin winding mechanism (usually a lever or button)․ Hold the thread end firmly for the first few rotations to secure it on the bobbin․ Wind the bobbin evenly‚ stopping when it’s nearly full․
Once wound‚ disengage the winding mechanism and remove the bobbin․ Locate the bobbin case – it’s typically under a sliding plate on the machine․ Insert the bobbin into the bobbin case‚ ensuring it rotates freely and the thread unwinds in the correct direction (refer to the diagram)․ Finally‚ guide the thread through the tension spring of the bobbin case before bringing it up to the needle area․

Mastering fundamental stitches unlocks creative potential; practice straight and reverse stitching to confidently begin your sewing journey with the Lil’ Sew & Sew․
Let’s begin with the foundational straight stitch! This is the workhorse of sewing‚ used for seams‚ topstitching‚ and countless other applications․ For your first project‚ we recommend practicing on scrap fabric․ Place your fabric under the presser foot‚ lowering it gently but firmly․
Ensure your fabric is aligned with the desired seam allowance – typically 5/8 inch․ Slowly depress the foot pedal‚ guiding the fabric with both hands․ Avoid pulling or pushing the fabric; let the machine do the work․
Maintain a consistent speed for a neat‚ even stitch․ Practice sewing straight lines‚ curves‚ and corners․ Don’t worry if your first attempts aren’t perfect; practice makes progress! Remember to use a coordinating thread color for visibility and to easily assess your stitch quality․
Reverse stitching is crucial for securing the beginning and end of your seams‚ preventing unraveling and ensuring a durable finish․ The Lil’ Sew & Sew features a reverse lever or button – locate this on your machine․
After starting your straight stitch‚ gently engage the reverse lever/button․ The machine will now stitch backward․ Sew a few stitches in reverse‚ approximately ½ inch long․ Release the lever/button and continue stitching forward․
Repeat this process at the end of your seam․ This “back tacking” creates a secure anchor point․ Avoid excessive reverse stitching‚ as it can weaken the seam․ Practice on scrap fabric to get a feel for the reverse function and achieve a neat‚ reinforced finish; Consistent back tacking is key to professional-looking results!
The Lil’ Sew & Sew allows you to customize your stitches by adjusting both length and width․ Locate the stitch length dial – typically marked with numbers indicating stitch length in millimeters․ Lower numbers create shorter stitches‚ ideal for delicate fabrics‚ while higher numbers produce longer stitches for heavier materials․
For width adjustment‚ find the width dial․ This controls the zigzag stitch width; a setting of ‘0’ creates a straight stitch․ Increasing the number widens the zigzag․ Experiment with different settings on scrap fabric to understand their effects․
Always test your chosen settings before sewing your project․ Incorrect settings can lead to puckering or weak seams․ Refer to your fabric’s recommended stitch length for optimal results․

Encountering problems? This section provides solutions for frequent issues like thread tangles‚ needle breaks‚ and power failures with your Lil’ Sew & Sew․
Thread bunching is a common frustration for new sewers‚ but often easily resolved․ First‚ re-thread the machine‚ ensuring the presser foot is up during threading – this opens the tension discs․ Incorrect threading is the most frequent cause!
Next‚ check your bobbin․ Is it wound evenly and inserted correctly? A loosely wound or improperly seated bobbin can create significant tension issues․ Also‚ confirm you’re using the correct type of thread for your fabric; heavier fabrics require stronger thread․
Finally‚ clean the machine! Lint and dust buildup can impede smooth thread flow․ Refer to the ‘Maintenance and Care’ section for detailed cleaning instructions․ If problems persist‚ slightly loosen the upper tension dial – but only incrementally!
Needle breakage can be startling‚ but is usually preventable․ The most common cause is using the wrong needle type for your fabric․ Delicate fabrics require finer needles (size 60/8 ─ 70/10)‚ while heavier materials need stronger ones (size 90/14 ─ 100/16)․
Ensure the needle is correctly inserted – fully pushed up into the needle clamp․ A loose needle will vibrate excessively and break easily․ Avoid sewing over pins! This is a major cause of needle damage․ Always remove pins before the needle reaches them․
Also‚ check for bent or damaged needles before starting to sew․ A slightly damaged needle is prone to breakage․ Finally‚ never force the fabric through the machine; let the feed dogs do the work․
If your Lil’ Sew & Sew isn’t powering on‚ begin with the simplest checks․ First‚ ensure the power cord is securely plugged into both the machine and a working electrical outlet․ Test the outlet with another device to confirm it’s functioning correctly․
Next‚ verify the power switch is in the “ON” position․ Some models have a separate voltage selector switch; confirm it’s set to the correct voltage for your region․ Check the foot pedal connection – ensure it’s firmly plugged into the machine․
If the pedal isn’t the issue‚ there might be an internal fuse that has blown․ (Consult a qualified technician for fuse replacement – do not attempt this yourself if you are uncomfortable․) Finally‚ inspect the power cord for any visible damage․
The Lil’ Sew & Sew offers limited stitch patterns and foot pedal control‚ expanding creative possibilities beyond basic straight stitching for varied projects․
The Lil’ Sew & Sew‚ while primarily designed for straight stitching‚ does offer a small selection of additional patterns to enhance your sewing projects․ Accessing these patterns is typically done via a dial or button located on the front of the machine․ Carefully rotate the dial to cycle through the available options – often including a zigzag stitch‚ which is incredibly versatile for finishing raw edges‚ creating decorative elements‚ and sewing stretch fabrics․
Experiment with different stitch widths and lengths for each pattern to achieve varied effects․ A narrower zigzag is ideal for delicate fabrics‚ while a wider stitch is better suited for heavier materials or decorative applications․ Remember to always test your chosen stitch on a scrap piece of fabric before applying it to your final project to ensure the desired outcome․ The manual provides a visual guide to each stitch pattern and its recommended uses․
The foot pedal is your primary tool for controlling the sewing speed of the Lil’ Sew & Sew․ Gentle pressure on the pedal results in slower stitching‚ perfect for intricate work or navigating corners․ Increasing pressure proportionally increases the sewing speed‚ allowing for faster completion of straight seams․
Practice coordinating your foot pressure with guiding the fabric – smooth‚ consistent pressure yields the best results․ Avoid abrupt changes in pressure‚ as this can cause uneven stitching․ The foot pedal isn’t simply an on/off switch; it’s a variable speed controller․ Mastering this control is key to achieving professional-looking seams and enhancing your overall sewing experience․ Refer to the diagrams in the manual for proper foot pedal placement and technique․
Regular maintenance ensures your Lil’ Sew & Sew operates optimally; cleaning‚ lubrication‚ and proper storage will extend its lifespan considerably․
Consistent cleaning is vital for the longevity of your Lil’ Sew & Sew․ Always unplug the machine before commencing any cleaning procedures․ Use a soft brush – often included with the machine – to remove lint and dust from the bobbin area‚ feed dogs‚ and around the needle plate․ A small vacuum cleaner with a brush attachment can also be helpful for reaching tight spaces․
For more stubborn lint‚ a slightly dampened (not wet!) cloth can be used․ Avoid using harsh chemicals or abrasive cleaners‚ as these can damage the machine’s components․ Pay particular attention to the area around the tension discs‚ ensuring they are free from debris․ Regularly wiping down the exterior casing with a soft‚ dry cloth will keep your machine looking its best․ Remember to oil the machine periodically‚ as detailed in the lubrication section‚ as this also aids in preventing dust buildup․
Regular lubrication ensures your Lil’ Sew & Sew operates quietly and efficiently․ Only use sewing machine oil specifically designed for this purpose; other oils can cause build-up and damage․ Refer to the diagram in the ‘Understanding Machine Parts’ section to locate the oiling points – typically‚ these include the bobbin race‚ the needle bar‚ and any areas where metal parts move against each other․
Apply a small drop of oil to each point‚ and then manually operate the machine (by turning the handwheel) to distribute the oil evenly․ Wipe away any excess oil with a clean cloth to prevent staining fabric․ Avoid over-oiling‚ as this can attract dust and lint․ Lubricate your machine after every 8 hours of use‚ or more frequently if you notice any squeaking or resistance․ Proper lubrication significantly extends the life of your sewing machine․
Proper storage safeguards your Lil’ Sew & Sew from dust‚ damage‚ and potential malfunctions․ Always unplug the machine and allow it to cool completely before storing․ The original dust cover is your first line of defense against dust accumulation; ensure it’s securely placed over the machine․ Store the machine in a dry‚ stable location‚ away from direct sunlight and extreme temperatures․
Avoid storing it in damp basements or humid attics․ Keep the foot pedal and accessories together with the machine‚ perhaps in a separate bag or compartment․ If you plan to store the machine for an extended period‚ consider removing the needle and lightly oiling it as described in the ‘Lubrication’ section․ This prevents corrosion and ensures it’s ready to use when you need it․

Always prioritize safety when operating the Lil’ Sew & Sew; keep fingers clear of the needle‚ and disconnect power when not in use․
Before beginning any sewing project‚ ensure the machine is placed on a stable‚ flat surface․ Always disconnect the power cord when changing the needle‚ threading‚ or performing any maintenance․ Never pull or push the fabric forcefully while sewing; let the machine feed the material naturally․
Keep the machine out of reach of children; Avoid using damaged power cords or plugs․ Do not operate the machine if it’s malfunctioning or damaged in any way․ Regularly inspect all parts for wear and tear․
Never insert fingers or any objects into the needle area while the machine is running․ Use the provided safety cover when not in use․ Be mindful of moving parts and maintain a safe distance․ Always turn off and unplug the machine before cleaning or storing it․ Following these guidelines will ensure a safe and enjoyable sewing experience․
Needle injuries are preventable with careful attention and proper technique․ Always use the correct needle type and size for your fabric․ Never sew over pins; remove them before the needle reaches that point․ When changing the needle‚ always point the needle upwards and use a protective thimble or needle inserter․
Avoid reaching into the needle area while the machine is powered on‚ even for quick adjustments․ If a needle breaks‚ immediately turn off and unplug the machine before attempting to remove the broken piece․ Dispose of broken needles safely in a designated sharps container․
Never attempt to bend or force a needle; Regularly inspect needles for damage‚ such as bends or dullness‚ and replace them as needed․ Maintaining a safe distance from the needle and following these precautions will significantly reduce the risk of injury․