Categories
Welcome! This manual details the iconic Pentax K1000, a fully mechanical 35mm SLR camera, offering a timeless photographic experience for beginners and enthusiasts.
The Pentax K1000, introduced in 1976, quickly became a cornerstone for photography students and hobbyists alike. Its enduring appeal stems from its simplicity, robust build quality, and complete manual operation. Unlike modern cameras with automated features, the K1000 places you in full control of the photographic process – aperture, shutter speed, and focus are all adjusted manually.
This hands-on approach fosters a deeper understanding of photographic principles. Learning with the K1000 isn’t about mastering a menu system; it’s about understanding the relationship between light, lens, and film. This manual aims to guide you through every aspect of using this classic camera, from loading film to achieving perfectly exposed and focused images. Prepare to embark on a rewarding journey into the world of analog photography!
The Pentax K1000 isn’t just a camera; it’s a symbol of photographic education. For decades, it served as the primary teaching tool in countless photography courses worldwide. Its straightforward design allowed students to concentrate on fundamental concepts – exposure, composition, and focusing – without being distracted by complex electronics.

Beyond its educational role, the K1000 gained a reputation for reliability. Its fully mechanical operation meant it could function in extreme conditions, unlike early electronic cameras. This durability, combined with its affordability, made it a favorite among professionals and enthusiasts. The K1000’s legacy continues today, inspiring a renewed interest in film photography and a desire for a more tactile, deliberate approach to image-making.
The Pentax K1000 boasts a robust, all-mechanical operation, eliminating reliance on batteries for core functions like the shutter. It utilizes a 35mm film format, accepting a wide range of K-mount lenses. The camera features a horizontal-travel cloth focal-plane shutter, offering speeds from 1 second to 1/1000th of a second, plus Bulb mode.
Its built-in center-weighted metering system assists in achieving correct exposure, though external metering is also easily accommodated. The viewfinder provides approximately 93% coverage. Key specifications include an ASA range of 12-3200, a standard thread for cable release, and a weight of approximately 690g without a lens. Its simplicity and dependability define its enduring appeal.
The Pentax K1000, while seemingly simple, comprises several key components. The lens mount accepts K-mount lenses, crucial for image formation. The shutter speed dial controls exposure time, while the aperture ring on the lens adjusts lens opening. The film advance lever advances the film and cocks the shutter.
The rewind crank rewinds the exposed film. The viewfinder allows composition, and includes focusing aids. The film counter displays the number of exposed frames. A hot shoe accommodates external flash units. The battery compartment houses the battery for the light meter. Finally, the tripod socket provides stability when using a tripod.
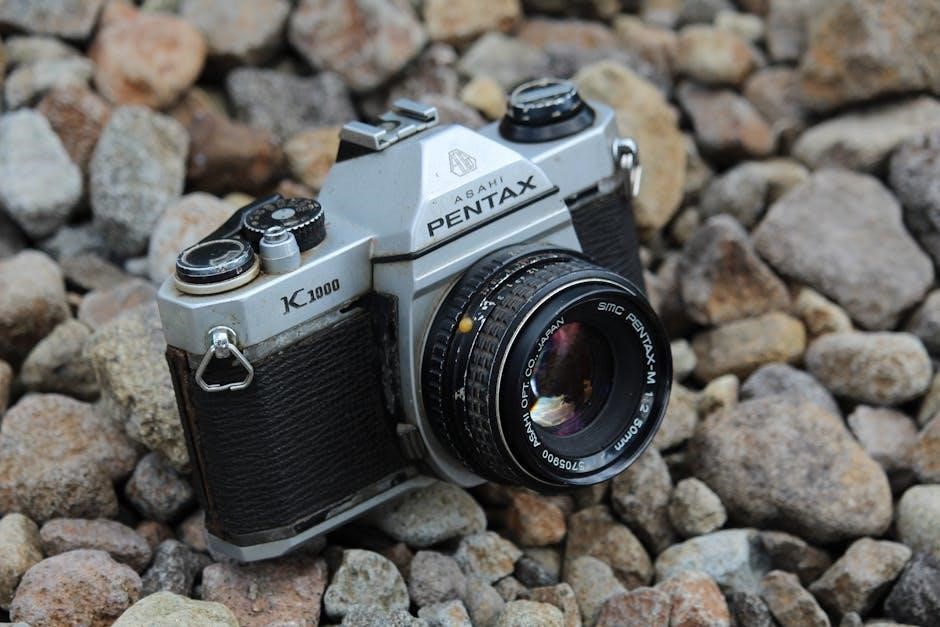
Looking at the Pentax K1000’s front, the lens is the most prominent feature. It’s interchangeable, utilizing the K-mount system. Around the lens, you’ll find the aperture ring, controlling the lens opening (f-stop) for depth of field and exposure. The focus ring adjusts sharpness.
Below the lens mount is the release button for detaching the lens. To the side, a small self-timer lever initiates a delayed shutter release. Note the filter threads on the lens barrel, allowing for the attachment of filters like UV or polarizing filters. The front plate is relatively clean, emphasizing the camera’s functional design. Understanding these controls is vital for creative photography.
The Pentax K1000’s top plate houses essential controls. The shutter speed dial, located on the right, allows selection from 1 second to 1/1000th of a second, plus Bulb (B) for long exposures. A separate film advance lever, when lifted and swept to the right, advances the film and cocks the shutter.
Next to the film advance is the rewind crank, used to rewind the film back into its cassette after exposure. The shutter release button, threaded for a cable release, initiates the exposure. A hot shoe allows attachment of an external flash. Finally, the film counter displays the number of frames exposed. Mastering these controls is key to operating the K1000 effectively.
The Pentax K1000’s back panel provides access to the film chamber and features the viewfinder. A latch releases the film back, allowing film loading and unloading. The viewfinder itself offers a bright, clear view of the scene, incorporating a split-image focusing aid in the center and a microprism collar surrounding it – crucial for achieving sharp focus.
Around the viewfinder are indicators displaying shutter speed and over/under exposure warnings when using the built-in light meter. A diopter adjustment dial compensates for individual eyesight. The back also includes a film rewind knob and a film pressure plate which secures the film during transport. Careful handling of this area ensures proper film loading and operation.
The Pentax K1000’s underside houses the battery compartment and the tripod socket. The camera requires a single LR44 or SR44 battery to power the light meter; the battery compartment is accessed via a sliding cover. Remember, the K1000 is fully mechanical and will function without a battery, but metering will be unavailable.
Centrally located is a standard 1/4-inch tripod socket, allowing secure mounting to a tripod for stability during long exposures or low-light conditions. Ensure the tripod is firmly attached before use. A small rewind release button is also present, preventing accidental film rewind. Inspect this area regularly for any signs of corrosion or damage.
Loading film into the Pentax K1000 is a straightforward process, crucial for successful photography. Begin by ensuring you have a compatible 35mm film cartridge. The K1000 utilizes a manual film loading system, requiring careful attention to detail. Proper loading prevents damage to the film and ensures accurate exposure throughout your roll.
This section will guide you through each step: opening the film back, inserting the cartridge correctly, threading the film leader onto the take-up spool, and finally, advancing the film and securely closing the camera back. Always load film in subdued light to avoid accidental exposure.
To open the film back of the Pentax K1000, locate the film rewind knob on the left side of the camera. Fully rotate this knob counter-clockwise. This action will release the latch and allow the back cover to swing open. Be gentle; do not force it.
Observe the interior – you’ll see the film chamber and the take-up spool on the right. The film rewind shaft is on the left. Ensure the camera back opens smoothly. If resistance is felt, double-check that the rewind knob is fully rotated. Opening the back in bright sunlight should be avoided to prevent unwanted film exposure. Prepare to insert your 35mm film cartridge.
With the film back open, carefully insert the 35mm film cartridge into the film chamber on the right side of the camera. Ensure the cartridge’s spool fits snugly into the receptacle. The film should unwind clockwise from the cartridge.
Gently push the cartridge fully into the chamber until it’s seated correctly. You should feel a slight click or resistance when it’s properly positioned. Avoid touching the film itself as much as possible to prevent fingerprints. Confirm the film cartridge is secure before proceeding to the next step – threading the film leader onto the take-up spool.
Locate the take-up spool on the left side of the film chamber. Gently pull the film leader – the protruding end of the film – across the camera’s interior. Carefully guide the film leader into one of the slots on the take-up spool.
Ensure a sufficient length of film leader is inserted into the spool’s slot to prevent it from slipping out during winding. A small turn of the film advance lever will help engage the perforations of the film with the teeth of the take-up spool. Observe that the spool begins to rotate as you advance the lever, confirming proper engagement.
After threading, gently advance the film using the film advance lever. Watch for the rewind knob on the left side to begin rotating; this confirms the film is properly engaged and advancing. Advance the lever two or three times, observing the film counter to ensure it’s registering.
Once you’re confident the film is securely loaded, carefully close the film back door. Ensure it latches firmly to prevent light leaks during exposure. A properly sealed back is crucial for successful image capture. Double-check the latch before proceeding to shooting!
The shutter speed dial, located on the top of the Pentax K1000, controls the duration the camera’s shutter remains open, exposing the film to light. It’s marked with a series of numbers – typically ranging from 1 second to 1/1000th of a second – plus ‘B’ for Bulb mode.
To adjust the shutter speed, lift the dial slightly and rotate it to the desired setting. A faster shutter speed (e.g., 1/500s) freezes motion, while a slower speed (e.g., 1/30s) allows more light in but can result in motion blur. ‘B’ mode keeps the shutter open as long as the shutter button is pressed.
The aperture, controlled by the f-stop ring on your lens, regulates the size of the lens opening, influencing both the amount of light reaching the film and the depth of field. Lower f-numbers (like f/2.8) indicate a wider aperture, letting in more light and creating a shallow depth of field – ideal for isolating subjects.
Higher f-numbers (like f/16) represent a smaller aperture, reducing light intake and increasing depth of field, keeping more of the scene in focus. To adjust, rotate the f-stop ring on the lens until the desired f-number aligns with the indicator mark. Remember aperture and shutter speed work together for proper exposure!
Achieving sharp focus is crucial for quality photographs. The Pentax K1000 utilizes manual focusing, requiring you to visually adjust the lens until your subject appears clear within the viewfinder. Rotate the focusing ring on the lens while observing the image on the focusing screen.
The split-image rangefinder in the center of the viewfinder assists with precise focusing. Align the two opposing images in the split-image circle; when they merge, your subject is in focus. Fine-tune adjustments are often needed for optimal sharpness, especially at wider apertures. Practice makes perfect!
The K1000’s viewfinder presents a bright, clear image for composing and focusing. It incorporates several helpful aids. Primarily, the central split-image rangefinder is key; aligning the two offset portions creates sharp focus. Surrounding this is a microprism collar, offering easier focusing with slightly less precision.
The outer area of the screen displays the focusing aids, while the edges show the approximate field of view of the selected lens. Remember the image you see is reversed left-to-right. Practice using these elements together to quickly and accurately achieve critical focus on your subject before pressing the shutter release.
Depth of field refers to the range of distance within a photograph that appears acceptably sharp. It’s controlled by aperture (f-stop) and focal length; A wider aperture (smaller f-number like f/2.8) creates a shallow depth of field – useful for isolating subjects with blurred backgrounds.
Conversely, a narrower aperture (larger f-number like f/16) yields a greater depth of field, keeping more of the scene in focus. The K1000’s depth-of-field preview lever allows you to visualize this effect before shooting; Understanding and manipulating depth of field is crucial for creative control and ensuring your intended subject is sharp.
Achieving proper exposure – the brightness of your photograph – relies on understanding the Pentax K1000’s center-weighted metering system. This system primarily measures light from the center of the frame, diminishing towards the edges. The meter indicates whether the scene is underexposed (too dark), overexposed (too bright), or correctly exposed.

To use it, set the desired shutter speed and aperture, then observe the needle in the viewfinder. Center it for correct exposure. Remember, the meter assumes an average scene reflectivity; adjustments may be needed for very bright or dark subjects. Mastering this system is key to consistently well-exposed images.
The Pentax K1000 utilizes a center-weighted averaging metering system. This means the camera prioritizes light readings from the central portion of the viewfinder – approximately 60-70% of the frame. Light levels from the periphery contribute less to the overall exposure calculation. This mimics how we often visually assess a scene, focusing on the main subject.
Consequently, strong light sources or dark areas outside the center can have a limited impact on the meter reading. It’s crucial to understand this bias when photographing high-contrast scenes. The meter aims for a middle gray, so adjustments are often needed for subjects significantly lighter or darker than average.
To activate the K1000’s light meter, gently half-press the shutter release button. This powers the meter and displays the exposure reading via the needle in the viewfinder. The needle indicates whether the scene is underexposed (left of the center mark), overexposed (right of the center mark), or correctly exposed (aligned with the mark).
Adjust either the shutter speed or aperture (or both!) until the needle aligns with the center mark. Remember, multiple combinations can achieve correct exposure. Prioritize settings based on your desired creative effect – faster shutter speeds freeze motion, while wider apertures create shallow depth of field.
The Pentax K1000 doesn’t have a dedicated exposure compensation dial. Instead, you manually adjust either the aperture or shutter speed to compensate for tricky lighting situations. For example, shooting a snowy scene requires increasing exposure (overexposing slightly) as snow reflects a lot of light.
To compensate, either open up the aperture (lower f-number) by one stop or slow down the shutter speed by one stop. Conversely, for dark subjects like a black cat, you’ll need to decrease exposure (underexpose slightly). Practice is key to mastering this skill, and referencing a sunny 16 rule can be helpful as a starting point.
Ready to capture your first image? First, compose your shot through the viewfinder. Next, gently press the shutter button halfway to activate the light meter and check focus. Once focused, continue pressing the shutter button fully to take the picture.
Listen for the satisfying click of the shutter. After each shot, advance the film using the film advance lever. Remember to check your settings – aperture and shutter speed – between each frame, adjusting as needed for changing light conditions. Consistent practice will build muscle memory and improve your photographic timing!
Once you’ve reached the end of the roll, it’s time to rewind! Locate the rewind crank on the top of the camera. First, press the film rewind release button on the bottom of the K1000. Then, gently turn the rewind crank in the direction of the arrow.

You’ll feel resistance initially, but as the film winds back into the cartridge, it will become easier. Continue winding until you feel the film leader completely release from the take-up spool. Don’t force it! Open the film back and carefully remove the film cartridge for developing.
The Pentax K1000 utilizes the Pentax K-mount, a remarkably versatile system. This means a vast array of lenses, both vintage and modern, are compatible. Pentax lenses are ideal, but many third-party manufacturers also produced K-mount lenses. When mounting a lens, align the red and green dots on the lens and camera body, then gently twist clockwise until it clicks into place.
To remove the lens, press the lens release button located near the base of the lens mount and twist counter-clockwise. Always handle lenses with care, avoiding touching the glass elements. Different focal lengths offer varying perspectives – experiment to find what suits your style!
Preserving your Pentax K1000 ensures years of reliable service. Regularly blow out dust from the film chamber and viewfinder with a blower – avoid canned air. Gently wipe the camera body with a soft, dry cloth. Never use solvents or abrasive cleaners! Store the camera in a cool, dry place, away from direct sunlight and moisture.
Periodically check the light seals around the film door; deteriorating seals can cause light leaks. Lens surfaces should be cleaned with lens tissue and appropriate cleaning solution. Avoid forcing any controls; if something feels stuck, consult a qualified repair technician. Proper care extends the life of this classic camera.
Encountering problems? Here are solutions to frequent K1000 issues. Film Not Advancing: Ensure the film is correctly loaded and the film advance lever is fully reciprocated. Check for obstructions in the film path. Shutter Not Firing: Verify the battery (if using a compatible accessory meter) is functional. Confirm the shutter speed dial isn’t set to ‘B’ without pressing the shutter release.
Light Meter Inaccuracy: The K1000’s meter relies on a separate accessory. Ensure correct battery installation and proper positioning of the meter. If issues persist, consider using an external light meter for accurate readings. Avoid self-repair if unsure; seek professional assistance to prevent further damage.
Struggling to advance film? Several factors can cause this. First, re-check film loading – ensure the film leader is correctly engaged with the take-up spool. A common issue is insufficient tension on the film as it’s initially threaded. Fully reciprocate the film advance lever; sometimes, a partial stroke isn’t enough to engage the mechanism.
Inspect the film path for any obstructions – a torn sprocket hole or a piece of debris can halt advancement. Verify the rewind knob isn’t resisting; accidental rewind can prevent forward movement. If the problem persists, carefully open the back (in subdued light!) and re-thread the film, ensuring smooth travel. Avoid forcing anything!
Encountering a non-firing shutter? The most frequent cause is a depleted battery, even though the K1000 is largely mechanical – the meter requires power to enable shutter release with certain settings. Confirm a fresh battery is correctly installed. Next, ensure the shutter speed dial isn’t set to ‘B’ (Bulb) mode, which requires manual holding.
Check the film advance lever; the K1000 often prevents firing if the film isn’t advanced. Verify the lens is properly mounted and the aperture is set. A misaligned or incompatible lens can block operation. If these steps fail, avoid forceful attempts; a professional camera repair might be necessary to address potential mechanical issues within the shutter mechanism.
Experiencing inconsistent light meter readings? First, ensure a fresh battery is installed, as a weak battery significantly impacts meter accuracy. Check the ASA/ISO setting on the camera; it must precisely match the film’s speed. An incorrect setting throws off exposure calculations. Clean the small window near the lens mount – dirt or obstructions interfere with light reaching the meter.
Consider ambient light conditions; extreme backlighting or very low light can challenge the meter. Compare readings with a known accurate external light meter if available. If discrepancies persist, the meter itself may require professional calibration. Remember, the K1000’s meter is center-weighted, so framing matters!
Beyond basic operation, the K1000 allows for creative exploration. Utilizing external light meters provides greater precision, especially in challenging lighting scenarios, offering more control than the built-in meter. Mastering hyperfocal distance – calculating the focus point for maximum depth of field – expands your landscape and group portrait capabilities.
Experiment with zone focusing, pre-setting focus for a specific range and relying on depth of field. Explore bracketing exposures, taking multiple shots at varying apertures and shutter speeds to ensure a properly exposed image. Consider using filters (polarizing, neutral density) to enhance colors or control light. The K1000’s manual controls encourage deliberate photographic thinking!
While the K1000’s built-in meter is reliable, external light meters offer enhanced accuracy and flexibility. Incident light meters measure the light falling on your subject, providing a more accurate reading, especially with complex lighting. Reflected light meters, like those in many modern cameras, measure light reflected from the subject.
To use an external meter, set it to the appropriate film speed (ISO); Take a reading, then translate the suggested aperture and shutter speed settings to your K1000. Remember to decouple the meter reading from the camera’s meter – ignore the K1000’s needle when using an external meter. This allows for precise exposure control, particularly in tricky lighting conditions, and expands your creative possibilities.
Hyperfocal distance is a crucial concept for maximizing depth of field, ensuring sharpness from a specific point to infinity. It’s the closest distance your lens can focus on while keeping objects at infinity acceptably sharp. Calculating it involves your lens’s focal length and aperture.

Using the K1000, you can estimate hyperfocal distance using depth-of-field scales on the lens. Set your desired aperture, align the corresponding marks on either side of the focus index, and your lens is focused at the hyperfocal distance. Everything from half that distance to infinity will be reasonably sharp. This technique is invaluable for landscape photography, ensuring maximum sharpness throughout the scene without relying on precise focusing.